 In this project, you will program the MBot-Omni to autonomously follow a wall. You will be writing the code directly on the robot.
Read these instructions for:
Getting the Code
To get the template code for this project, see your course page for the GitHub Classroom assignment link.
Once you have accepted the assignment, which will create a GitHub repository for your project code, you will need to get the code onto the robot. You will be cloning the repository on the robot's Raspberry Pi. See the robot programming guide for instructions on how to open a remote VSCode session connected to the robot. Once you are connected to the robot, in VSCode, open a terminal. This should be a terminal in the robot's Raspberry Pi. Then, clone the repository in the home directory:
git clone <ADDRESS>Substitute <ADDRESS> with the Git address for your repository found on GitHub. Open the folder of the repository you just cloned in VSCode using the instructions in the tutorial.
You should always sign the license for your code by editing the file LICENSE.txt. Replace <COPYRIGHT HOLDER> with the names of all teammates, separated by commas. Replace <YEAR> with the current year.
-
P1.0:
In the file
LICENSE.txt, replace<COPYRIGHT HOLDER>with the names of all teammates, separated by commas. Replace<YEAR>with the current year.
Code Overview
In Project 0, we compiled our C++ code on Replit. Replit took care of calling the C++ compiler and generating an executable that we could run. This time, we have a bit more code to deal with. The wall follower code will have dependencies on external libraries to drive the robot and read data from the Lidar. We could compile the source code directly by running a similar command to Replit, but the command would be much longer and more complicated. Instead, we'll use a tool called CMake. CMake finds all the code and external libraries we need and generates instructions to build the executable. To build the code, in a terminal, type:
cd ~/[my-wall-follower-dir]/build
cmake ..
make
Remember that the code should be cloned and compiled on the Raspberry Pi. This will fail on your computer!
You should replace [my-wall-follower-dir] with the name of your wall follower directory.
Let's look at these instructions line by line:
-
cd ~/[my-wall-follower-dir]/build: Changes the directory to thebuildfolder, where all the files CMake needs will be generated. The executables will also be in this folder. Keeping all the files related to compilation inbuildkeeps our code organized. -
cmake ..: Calls CMake, and tells it to use the instructions in the fileCMakeLists.txtwhich is located in the root of the repository to generate instructions to compile the code. Generally,cmake ..only needs to be called once, not every time you change your code. -
make: Compiles the code, using the instructions generated by CMake (called Makefiles). You need to rerunmakeevery time you change the code.
Repository structure
The repository includes the following dirctories and files:
-
build: Build files and executables should be generated here. All commands to compile code should be executed inside this directory. The contents are not pushed to GitHub. -
include: Header files are stored in this directory. These allow us to include code written in separate files in our code. -
src: Source code and executables are stored here. All your changes should be in this folder. -
CMakeLists.txt: Instructions for CMake to use to find dependencies and compile executables.
Provided functions & structs
To use provided functions, all you need to do is include the correct header file. The needed header files should already be included in the templates. You should also use the MBot Bridge API to control the robot and read data. The following functions are provided:
-
void sleepFor(double secs): Sleep for a given number of seconds. -
double normalizeAngle(double angle): Normalize an angle in the range [-pi, pi]. This function returns the normalized angle.
The Python code contains two files where you should write your code:
-
drive_square.py: The template where you will complete the Drive Square task. -
wall_follower.py: The template where you will complete the Wall Follower.
You should use the MBot Bridge API to control the robot and read data.
Project Description
This project is separated into two parts. Most of the time you spend on this project should be spent on part 2.
- Part 1: Intended to help you get used to programming the robot and sending velocity commands to drive it.
- Part 2: The wall follower.
A number of functions have been provided for you along with the template code. Make sure you read the code overview to learn how to use them, and refer to the MBot Bridge API to learn how to control the robot and read its sensor data.
Part 1: Drive Square
We will start by driving the robot in a square without any sensor feedback. For this part, you will write your code in the file src/drive_square.cpp, in the main functiondrive_square.py.
Write code to make the robot drive in a 1 meter by 1 meter square three times. The square is not expected to be perfect.
-
P1.1 DEMO:
Demonstrate your robot driving in a square three times to a member of the course staff.
You should write your code in the file
src/drive_square.cppdrive_square.py. Commit and push your changes to GitHub.
- Hint: You can use the
drive()function together with thesleepFor()time.sleep()function to make the robot drive in one direction for a certain amount of time. To drive in a square, you might drive forward for one second, left for one second, backward for one second, then right for one second. - Hint: Start by writing code to drive the robot in a square once. Then, you can add a
forloop to repeat the pattern however many times you would like. - Hint: It's good practice to create variables in the
mainfunctionmain script to store constants. For example, you might want to define variables to store the velocity you are driving at, the number of seconds to drive for, and the number of times to repeat the square.
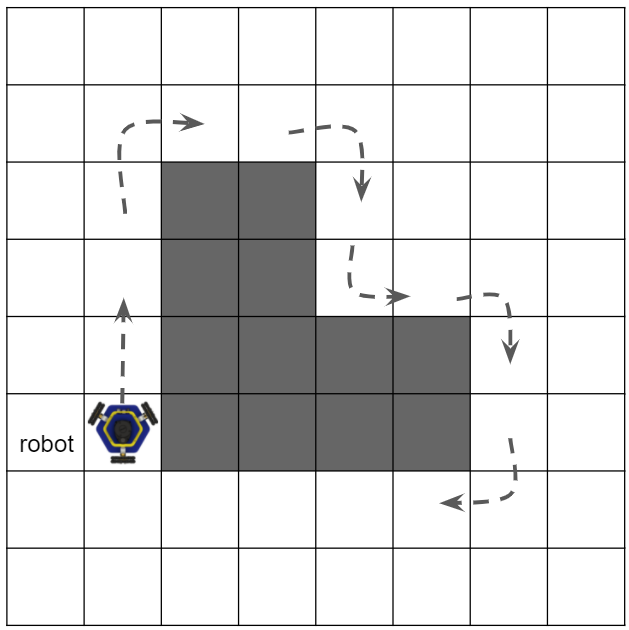
Part 2: Wall Following
Now that we have gotten used to controlling the robot and reading Lidar data, we're ready to code a wall follower! The wall follower should run forever, until the program is stopped with Ctrl-C. At each iteration, the wall follower should do the following:
- Find the distance to the nearest wall and the angle where the wall is located (use
findMinDist()find_min_dist()for this part). - Use the cross product to find a vector pointing parallel to the wall, in the direction the robot should drive.
- Apply a correction to the vector using bang-bang or P-control to move closer to or farther from the wall, depending on the current distance to the wall.
- Convert the vector to a velocity vector and send a velocity command to the robot.
First, we need to write code to find the distance to the nearest obstacle. Calling the function robot.readLidarScan()robot.read_lidar_scan() fills the ranges vector passed to it with the length, or range, of each ray in the scan in meters. The distance to the nearest obstacle is the range of the shortest ray in the scan.
Complete the provided function, findMinDist(), in src/common/utils.cpp so that it finds the index of the shortest ray. For example, if the smallest range in ranges is the tenth element at index 9, the function should return 9.
-
P1.2.1: In the file
src/common/utils.cpp, complete the functionfindMinDist()so that it finds the minimum length ray in the given scan. Return the index of this ray.
Complete the provided function, find_min_dist(), in wall_follower.py so that it finds the length and angle of the shortest ray. For example, if the smallest range in ranges is the tenth element at index 9, the function should return the tuple ranges[9], thetas[9].
-
P1.2.1: In the file
wall_follower.py, complete the functionfind_min_dist()so that it finds the minimum length ray in the given scan. Return the length and angle of this ray.
- Hint: Remember to ignore rays with zero range when finding the minimum range value. Rays with zero range are invalid. If you forget to check for invalid rays, the minimum range will always be zero.
Next, you will need to write the cross product function, in the provided function in src/common/utils.cppwall_follower.py.
-
P1.2.2: In the file
src/common/utils.cppwall_follower.py, complete the functioncrossProduct()cross_product()to find the cross product between two vectors. The input should be two vectors of length 3, corresponding to the x, y, and z components of the input vectors. The output should be a vector of length 3 corresponding to the components of the resulting cross product.
- Hint: For a vector
v, the x component should be stored inv[0], the y component should be stored inv[1], and the z component should be stored inv[2].
Once both functions are completed, you are ready to write your wall follower. The wall follower code should go in src/wall_follower.cppwall_follower.py. You can implement either the bang-bang controller or the P-controller discussed in class.
-
P1.2.3 DEMO:
Demonstrate that your robot can follow a wall to course staff.
For full points, your robot should successfully complete two laps around a course defined on Demo Day.
You should write your code in the file
src/wall_follower.cppwall_follower.pyusing the procedure outlined above. You will need to use your functionsfindMinDist()find_min_dist()andcrossProduct()cross_product().
- Hint: You should create variables to store the setpoint (how far your robot should stay from the wall) and the magnitude of the correction you will apply. You might also want to declare an acceptable margin where you won't apply a correction, and the velocity of the robot. These values will need to be tuned to make your wall follower work well!
Task Summary
-
P1.0:
In the file
LICENSE.txt, replace<COPYRIGHT HOLDER>with the names of all teammates, separated by commas. Replace<YEAR>with the current year. -
P1.1 DEMO:
Demonstrate your robot driving in a square three times to a member of the course staff.
You should write your code in the file
src/drive_square.cppdrive_square.py. Commit and push your changes to GitHub. -
P1.2.1:
In the file
src/common/utils.cppwall_follower.py, complete the functionfindMinDist()find_min_dist()so that it finds the minimum length ray in the given scan. Return the index of this ray. Return the length and angle of this ray. -
P1.2.2:
In the file
src/common/utils.cppwall_follower.py, complete the functioncrossProduct()cross_product()to find the cross product between two vectors. -
P1.2.3 DEMO:
In the file
wall_follower.cppwall_follower.py, write a program that follows a wall using the procedure outlined above. You will need to use your functionsfindMinDist()find_min_dist()andcrossProduct()cross_product(). For full points, your robot will need to successfully complete 2 laps around the course defined by the course staff.