Autonomous Navigation
Module 2
Contents
Lectures
| Topic | Checkpoints |
|---|---|
| State Machines & Bug Navigation [Lecture Video, Slides] | Super Mario State Machine |
| Coordinate Frames [Lecture Video, Slides] | P2.1: Robot Hits the Spot |
| Odometry [Lecture Video, Slides] |
Guides & Tutorials
The following guides and tutorials will be helpful for completing the checkpoints for this module and Project 2.
- Robot Quick Start: Getting up and running using your robot.
- GitHub: We will use GitHub to store all of the code for this course.
- Programming the Robot: You can program your robot from your computer using VSCode.
- The MBot Bridge API: You will use these functions to read data from your robot and control it.
- MBot Debugging Guide: Something not working? Check out these debugging tips first!
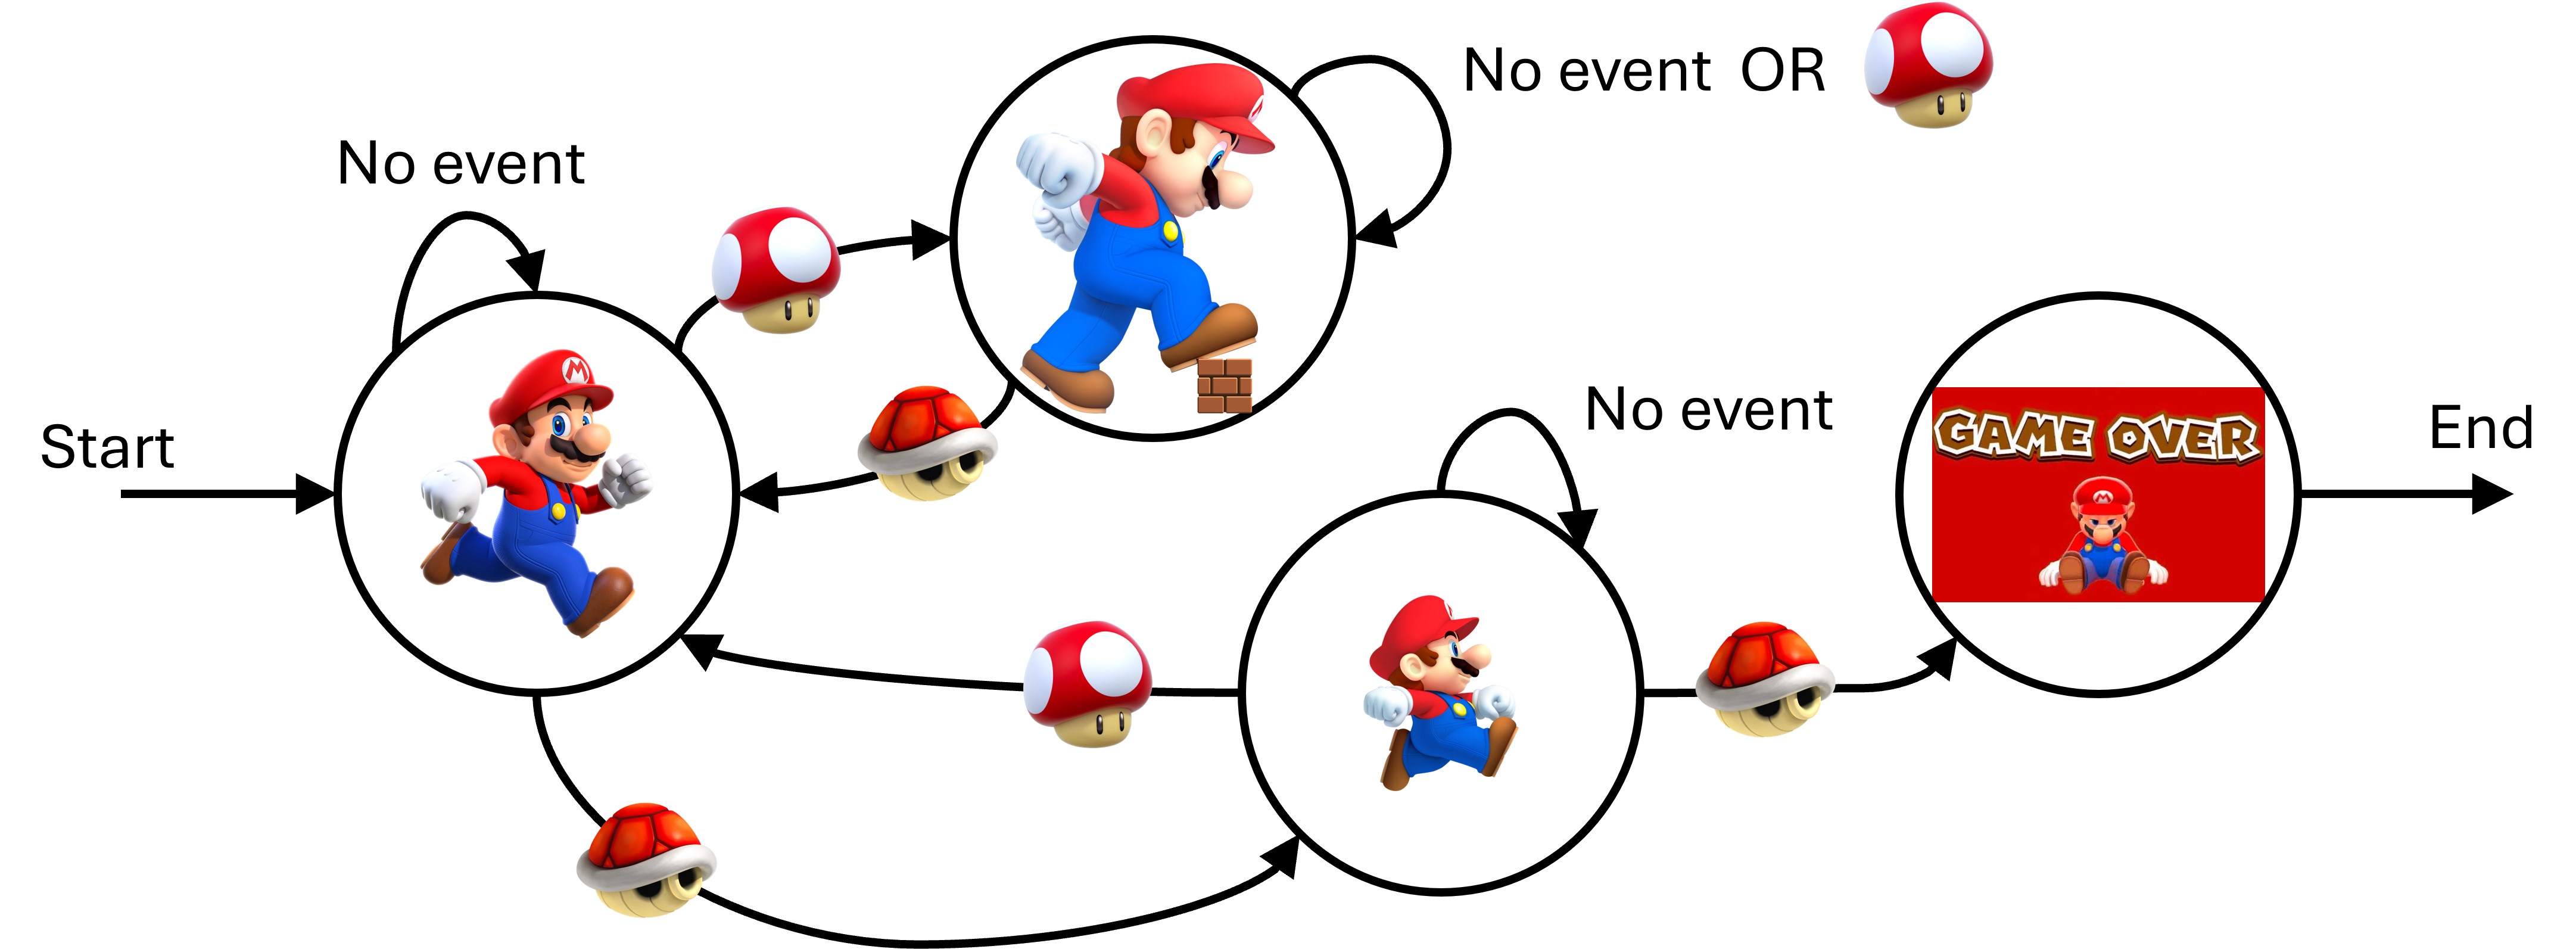
Checkpoint: Super Mario State Machine
In this checkpoint, we will write a Finite State Machine to transition Mario between states based on events in the game environment. Mario has three states:
- Small Mario (represented as the
.character or0) - Regular Mario (represented as the
mcharater or1) - Big Mario (represented as the
Mcharater or2) - Dead Mario (represented as the
xcharater or-1)
Mario starts off Regular Mario (m), and encounters events. Events are represented as char variables, and the whole game sequence is stored as a vector of events. Mario can encounter the following events:
- No event (an underscore,
_): State states the same. - A turtle (a minus sign,
-): This makes Mario decrease to the next smallest size. If he is already Small Mario, this will terminate the game. - A mushroom (a plus sign,
+): This will make Mario increase to the next biggest size. If he is already Big Mario, he will stay the same size.
This is a Finite State Machine that can be visualized as follows:
Compiling and Testing the Code
The template code for this checkpoint will animate the sequence of the Mario character with some random events by default. You can visually inspect the sequence and make sure that it follows the rules above. Once you feel confident, push your code to GitHub and use the autograder tests provided in GitHub Classroom to make sure that your code is correct (tutorial).
You can compile the C++ file you are editing on the command line (make sure that you are in a terminal in the same directory that the file super_mario.cpp is in!):
g++ super_mario.cpp -o super_mario
Then, run the executable you just created from the same folder:
./super_mario
By default, this will create a random sequence of 50 events.
To run the tests that the autograder will run, add the path to one of the files in test/ after the command. For example,
./super_mario test/no_events.txt
will run a sequence of 40 events with only the “No Event” character, _. Mario should stay the same size (m, or state 1), and the sequence should run to the end, printing out the following at the end:
Final Mario state: m Run length: 40
-
Edit the file
super_mario.cppto implement a finite state machine describing the state transtitions above. The state should be correctly updated and stored in the variablemarioState.
- Hint: Do not change the print statements at the end. This will ensure the tests run correctly.