Feedback Control
Module 1
Contents
Lectures
For these lectures, some checkpoints are run on the robot, and others are C++ checkpoints that can be run on your computer. Watch the corresponding lecture before completing the checkpoint.
| Topic | Checkpoints |
|---|---|
| Feedback Control [Lecture Video, Slides] | Follow Me (1D) (on the robot) |
| Omnidrive Geometry [Lecture Video, Slides] | Polar Ray Conversion (C++) Drive Star (on the robot) |
| Wall Following [Lecture Video, Slides] | Find Minimum Value (C++) Follow Me (2D) (on the robot) |
Guides & Tutorials
The following guides and tutorials will be helpful for completing the checkpoints for this module and Project 1.
- Robot Quick Start: Getting up and running using your robot. If this is the first time you are using your robot and it has not been set up, take a look at the setup guides in the MBot Overview.
- Installing VSCode: Setting up VSCode on your computer.
- GitHub: We will use GitHub to store all of the code for this course.
- Programming the Robot: You can program your robot from your computer using VSCode.
- The MBot Bridge API: You will use these functions to read data from your robot and control it.
Checkpoints: On the Robot
For this module, there are three checkpoints that you will complete on the robot:
- Follow Me! (1D): You will develop a feedback controller to make the robot maintain a fixed setpoint directly in front of it.
- Drive Star: You will write code to make the robot drive in a star-shaped pattern.
- Follow Me! (2D): You will develop a feedback controller to make the robot follow you in any direction.
Template code for all these checkpoints is in the same repository. Each checkpoint assumes that you have completed the appropriate lecture.
Read these instructions for:
Prerequisites
Grab a robot with a fully charged battery. Before you begin, you will need to have followed these guides on your laptop:
- Make sure your robot is setup by following the Quick Start Guide
- Install VSCode (tutorial)
- Connect to the MBot with VSCode remote (tutorial)
Getting the Code
See the course website for the course at your home institution for links to the template and submission instructions for this checkpoint.
Once you have accepted the assignment, clone the repository you created on the robot. In a VSCode remote session connected to the robot (tutorial), open a new terminal. Then, type:
git clone <ADDRESS>
Substitute <ADDRESS> with the address for your repo, found on GitHub. You can get the address from your repo page on GitHub:
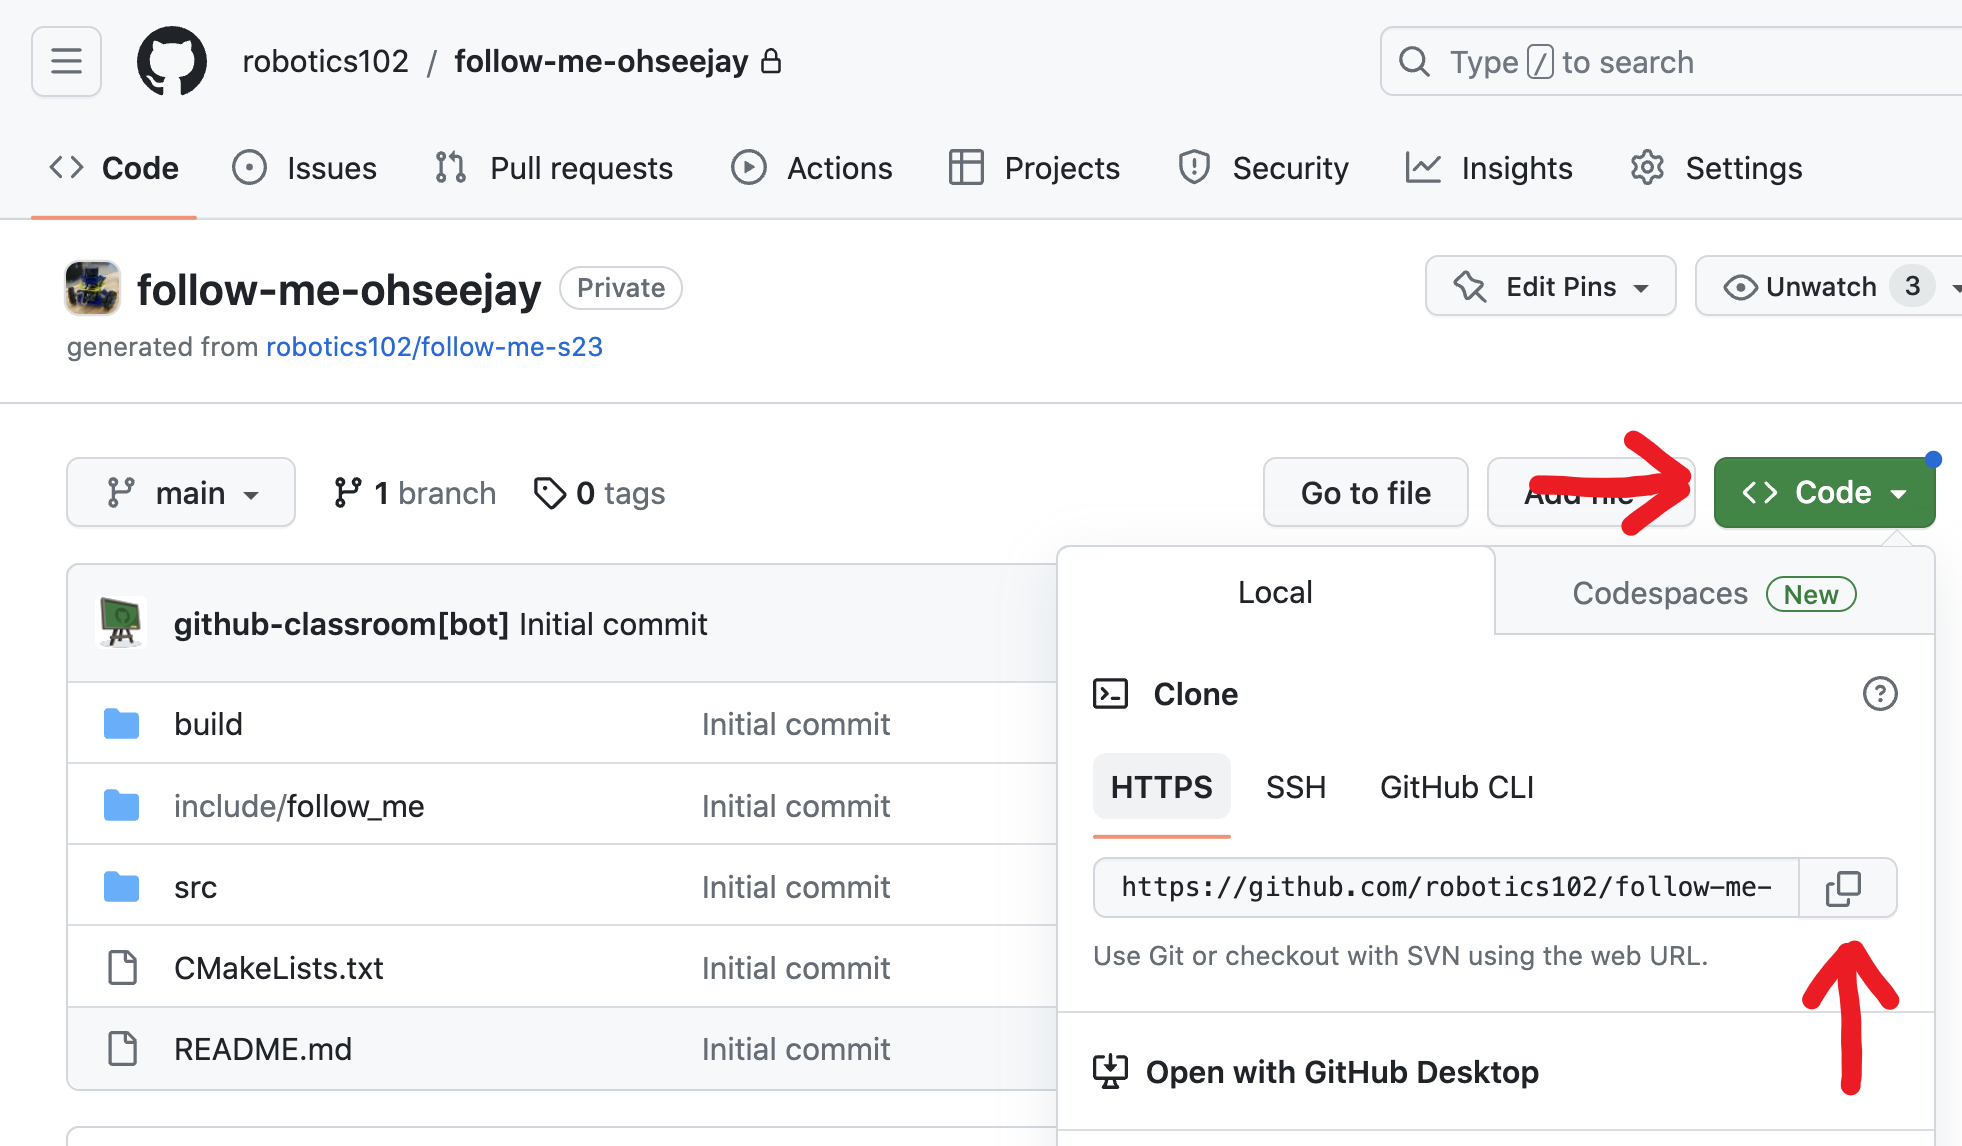
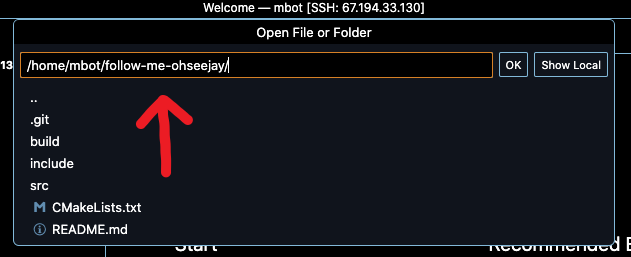
Open the folder of the repository you just cloned in VSCode by cliking "File" > "Open Folder…" then typing in the name of the repo you cloned:
Code Overview
We will use the MBot Bridge API to control the robot. Review the documentation for instructions on how to use the provided functions.
Compiling the Code
We’ll use a tool called CMake to compile the code. CMake finds all the code and external libraries we need and generates instructions to build the executable. To build the code, in a terminal, type:
cd ~/[my-code-dir]/build
cmake ..
make
Remember that the code should be cloned and compiled on the Raspberry Pi. This will fail on your computer!
You should replace [my-code-dir] with the name of your Follow Me directoy.
You only need to run cmake .. once. When you start writing code, you can compile it by typing make in the build/ folder. (Calling CMake multiple times won’t hurt, though!)
Running the Code
When you run make successfully, it will generate three executables: follow_1D is the 1D Follow Me code from the file src/follow_1D.cpp, drive_star is the Drive Star checkpoint code from the file drive_star.cpp, and follow_2D is the 2D Follow Me code from the file src/follow_2D.cpp.
Run them from the command line, in the build/ folder, to test your code for the 1D or 2D follow me, or drive star (only run one of these):
./follow_1D
./drive_star
./follow_2D
The template code contains two files:
follow_1D.pyfor Part 1 (1D) of this checkpoint,follow_2D.pyfor Part 2 (2D) of this checkpoint.
Follow Me! (1D)
In this checkpoint, you will program the robot using a feedback controller. This checkpoint will build foundational code that will help you complete Project 1: Wall Following.
We will write a program to make the robot maintain a fixed distance from the object in front of it. Edit the file src/follow_1D.cpp follow_1D.py to implement a Bang-Bang controller. When you’re done, your code should look something like this:
You will use the MBot Bridge API to program the robot. Review the functions available before getting started.
-
Edit the file
src/follow_1D.cppfollow_1D.pyto implement a Bang-Bang controller. Commit and push your changes to GitHub.
- Hint: Use the
robot.drive(vx, vy, wz)function to move the robot. - Hint: You may want to try a P-controller instead! How do the two compare?
Drive Star
In this checkpoint, we will practice driving the robot using the concepts of Omnidrive Geometry by driving in a star shape.
Note: You might want to start by completing the Ray Conversion C++ Checkpoint first.
-
Edit the code in the file
src/drive_star.cppso that the robot drives in a star pattern.
- Hint: First, you should work out what the correct commands should be for the robot to trace out a star shape (try drawing it out!). You might find it easiest to write down the distances and directions to trace out a star in polar coordinates. Remember that the robot drives using Cartesian coordinates, so make sure to convert your polar coordinate commands!
- Hint: You can use the
drive()function together with thesleepFor()time.sleep()function to make the robot drive in one direction for a certain amount of time. To drive in a star, you might drive along one line for one second, drive along the second line for one second, etc. - Can you trace out more shapes with the robot?
Follow Me! (2D)
For this part of the activity, you will be editing src/follow_2D.cpp follow_2D.py.
First, you will need to write the function findMinDist() find_min_dist().
This function should take in a vector of Lidar range values, and return the index of the shortest ray in the scan.
This function should take in a vector of Lidar range values and angles, and return the length and angle of the shortest ray in the scan.
Invalid rays will have zero range. You should ignore any zeros when finding the shortest range.
Note: You might want to start by completing the Find Minimum Value C++ Checkpoint first.
When you have completed the checkpoint, your robot should be able to follow you, like this:
-
Edit the function
findMinDist()in the filesrc/follow_2D.cppto return the index of the shortest ray. Edit the functionfind_min_dist()in the filefollow_2D.pyto return the length and angle of the shortest ray.
- Hint: Remember to ignore rays with zero range when finding the minimum range value. Rays with zero range are invalid. If you forget to check for invalid rays, the minimum range will always be zero.
Next, edit src/follow_2D.cpp follow_2D.py to maintain a setpoint distance to the nearest wall in any direction. You will use the function findMinDist() find_min_dist() to get the distance and angle to the nearest object. This is done for you in the code:
// Get the distance to the wall.
float min_idx = findMinDist(ranges);
float dist_to_wall = ranges[min_idx];
float angle_to_wall = thetas[min_idx];
# Get the distance and angle to the wall.
dist_to_wall, angle_to_wall = find_min_dist(ranges, thetas)
The variable dist_to_wall will then contain the distance to the nearest wall, and angle_to_wall will contain the angle to the wall. Your drive commands will now be in the direction of the nearest wall instead of just forward.
-
Edit the main function in file
src/follow_2D.cppfollow_2D.pyto implement a Bang-Bang controller again, but this time maintaining the distance to the nearest wall.
Checkpoints: C++
The following are C++ checkpoints related to the lectures for Module 1. These can be run on your computer (not the robot). Review instructions in Module 0 for instructions on writing C++ code. Use the autograder tests provided in GitHub Classroom to make sure that your code is correct (tutorial).
You can compile the C++ file you are editing on the command line (make sure that you are in a terminal in the same directory that the file my_code.cpp is in!):
g++ my_code.cpp -o my_code
replacing my_code.cpp with the name of your file (for example, ray_conv.cpp for the Polar Ray Conversion checkpoint). Then, run the executable you just created from the same folder:
./my_code
You can pick any name that you want to replace my_code.
Polar Ray Conversion
In this checkpoint, you will convert polar coordinates to Cartesian coordinates. You will do this operation often to drive the Omnidrive robot!
-
Edit the file
ray_conv.cppso that it asks the user for two float values (a distance in meters and an angle in radians), then converts them intoxandyCartesian values. Print out thexandycoordinates.
Finding the Minimum Value
In this checkpoint, you will write code to find the smallest value in a vector. You will have to write a similar function in the 2D Follow Me checkpoint and in Project 1. You may want to review the lecture on C++ vectors in Module 0 before you begin.
-
Edit the file
find_min.cppso that it finds the index of the minimum value in a vector. Print out the index of the value and the minimum value at that index.
- Hint: When you are testing, you can define the values of the vector
raysto be whatever you would like. Before you push the code, uncomment the linegather_user_input(rays);which will allow the user to input a vector. The autograder uses this to input different vectors for testing.